As a System Administrator, we tend to manage a number of MYSQL Server instance. So we need to find a better way of managing this set of mysql server into much a easier and centralized way. In my environment, I have 5 different MySQL database servers running separately under different server location. Since it run standalone and not in cluster mode, I need to have one platform to manage these database servers altogether.
PHPmyAdmin is able to do this, with some changes on the configuration files. You just need to allow the MySQL user and host on every database server to be connected to. The setup that I am going to do will be as below:

Inorder to install phpmyadmin on ubuntu, you need 3 main packages apache , MySQL and php has to be installed and configured properly.
1. Apache2 installation and configuration
2. Mysql installation
3. PHP installation
I’m assuming you have already installed a running LAMP on your server.
After installing apache2, mysql and php, you can continue with the below steps to install and configure phpmyadmin
SET UP
The steps in this tutorial require the user to have root privileges on your VPS.
Variables being used in this tutorial are:
Web Server IP: 192.168.1.150
PHPmyAdmin directory: /etc/phpmyadmin
User: phpmaroot
Password: pmapass123!
Install phpmyadmin
We will going to install phpmyadmin on svr1.webserver, and this server will going to manage our MYSQL servers
apt-get install phpmyadmin
Create root user to manage phpmyadmin
This step is optional, ofcourse we may use root to login on phpmyadmin.
mysql> CREATE USER 'phpmaroot'@'%' IDENTIFIED BY 'pmapass123!';
mysql> GRANT ALL PRIVILEGES ON *.* TO phpmaroot@'%';
Modify my.cnf of mysql servers
Make sure all database servers are listening to all IP which accessible from outside. To simplify this, just remove or comment if you find following lines in your my.cnf file (usually located under /etc) :
#bind-address=127.0.0.1
#bind-address=localhost
Make MySql accessible
To differentiate our MySQL servers easily, better we add the servers’ hostname into Web Server/PHPmyAdmin server /etc/hosts file. Based on my requirements above, I will add following line into the web server /etc/hosts:
vi /etc/hosts
root@i-svr:/etc/phpmyadmin# vi /etc/hosts
127.0.0.1 localhost
127.0.1.1 i-svr.dev i-svr

svr2.mysql 192.168.1.90
svr3.mysql 192.168.1.91
svr4.mysql 192.168.1.92
svr5.mysql 192.168.1.93
svr6.mysql 192.168.1.94
Modify phpmyadmin configuration file
We need to create PHPmyAdmin configuration files to include all databases server as above. Copy the configuration example as below to the active configuration file:
cp /etc/phpmyadmin/config.inc.php /etc/phpmyadmin/config.inc.php.bak
always make a backup
Find and uncomment the line below:
//$cfg['Servers'][$i]['AllowNoPassword'] = TRUE;
$cfg['Servers'][$i]['AllowNoPassword'] = TRUE;
Inside this file you will also see following line:
/* Authentication type */
//$cfg['Servers'][$i]['auth_type'] = 'cookie';
/* Server parameters */
//$cfg['Servers'][$i]['host'] = 'localhost';
//$cfg['Servers'][$i]['connect_type'] = 'tcp';
//$cfg['Servers'][$i]['compress'] = false;
/* Select mysqli if your server has it */
//$cfg['Servers'][$i]['extension'] = 'mysql';
Append the code below on top of the above lines:
/* Authentication type */
$cfg['Servers'][$i]['auth_type'] = 'cookie';
/* Server parameters */
$cfg['Servers'][$i]['host'] = 'svr2.mysql';
$cfg['Servers'][$i]['connect_type'] = 'tcp';
$cfg['Servers'][$i]['compress'] = false;
/* Select mysqli if your server has it */
$cfg['Servers'][$i]['extension'] = 'mysql';
$cfg['Servers'][$i]['AllowNoPassword'] = false;

/*
* Second server
*/
$i++;
/* Authentication type */
$cfg['Servers'][$i]['auth_type'] = 'cookie';
/* Server parameters */
$cfg['Servers'][$i]['host'] = 'svr3.mysql';
$cfg['Servers'][$i]['connect_type'] = 'tcp';
$cfg['Servers'][$i]['compress'] = false;
/* Select mysqli if your server has it */
$cfg['Servers'][$i]['extension'] = 'mysql';
$cfg['Servers'][$i]['AllowNoPassword'] = false;

/*
* Third server
*/
$i++;
/* Authentication type */
$cfg['Servers'][$i]['auth_type'] = 'cookie';
/* Server parameters */
$cfg['Servers'][$i]['host'] = 'svr4.mysql';
$cfg['Servers'][$i]['connect_type'] = 'tcp';
$cfg['Servers'][$i]['compress'] = false;
/* Select mysqli if your server has it */
$cfg['Servers'][$i]['extension'] = 'mysql';
$cfg['Servers'][$i]['AllowNoPassword'] = false;

/*
* Fourth server
*/
$i++;
/* Authentication type */
$cfg['Servers'][$i]['auth_type'] = 'cookie';
/* Server parameters */
$cfg['Servers'][$i]['host'] = 'svr5.mysql';
$cfg['Servers'][$i]['connect_type'] = 'tcp';
$cfg['Servers'][$i]['compress'] = false;
/* Select mysqli if your server has it */
$cfg['Servers'][$i]['extension'] = 'mysql';
$cfg['Servers'][$i]['AllowNoPassword'] = false;

/*
* Fifth server
*/
$i++;
/* Authentication type */
$cfg['Servers'][$i]['auth_type'] = 'cookie';
/* Server parameters */
$cfg['Servers'][$i]['host'] = 'svr6.mysql';
$cfg['Servers'][$i]['connect_type'] = 'tcp';
$cfg['Servers'][$i]['compress'] = false;
/* Select mysqli if your server has it */
$cfg['Servers'][$i]['extension'] = 'mysql';
$cfg['Servers'][$i]['AllowNoPassword'] = false;
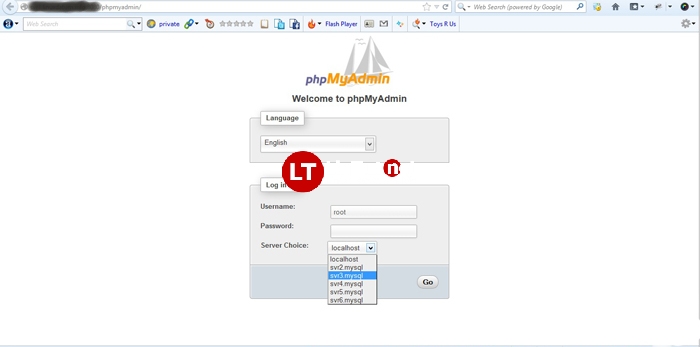
Now you should be able to open the PHPmyAdmin via web browser at http://192.168.1.150/phpmyadmin . You can select MySQL servers you want to connect and access it using phpmaroot user as created above.