Install and configure OpenVPN server on Ubuntu 13.10 server
A Virtual Private Network (VPN) is a network technology that creates a secure network connection over a public network such as the Internet.
OpenVPN is an open source VPN daemon by James Yonan. OpenVPN is a robust and highly flexible VPN daemon. OpenVPN supports SSL/TLS security, ethernet bridging, TCP or UDP tunnel transport through proxies or NAT, support for dynamic IP addresses and DHCP, scalability to hundreds or thousands of users, and portability to most major OS platforms.
In this tutorial explain steps to setup and configure OpenVPN server and client on Ubuntu 13.10 for remote access.
Install OpenVpn Server on Ubuntu 13.10
To install openvpn in a terminal enter:
$ sudo apt-get install openvpn easy-rsa -y
Copy the necessary keys from the openvpn server
To setup your own Certificate Authority (CA) and generating certificates and keys for an OpenVPN server and multiple clients first copy the easy-rsa directory to /etc/openvpn.
$ mkdir /etc/openvpn/easy-rsa
$ cp -rf /usr/share/easy-rsa/* /etc/openvpn/easy-rsa/
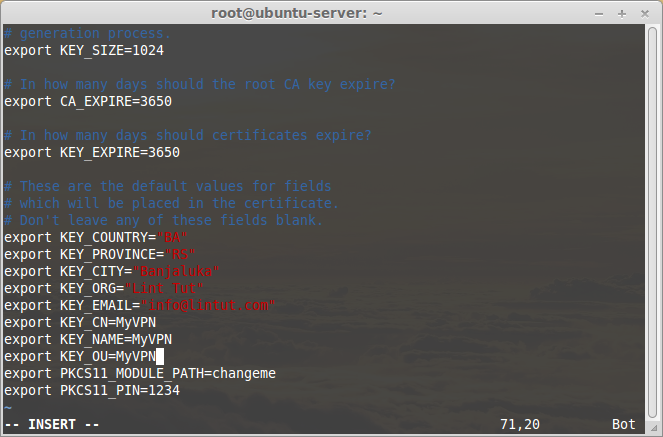
Edit /etc/openvpn/easy-rsa/vars:
$ vi /etc/openvpn/easy-rsa/vars
And, change the values that matches with your country, state, city, mail id etc.
...
export KEY_COUNTRY="BA"
export KEY_PROVINCE="RS"
export KEY_CITY="Banjaluka"
export KEY_ORG="Lin Tut"
export KEY_EMAIL="info@lintut.com"
export KEY_CN=MyVPN
export KEY_NAME=MyVPN
export KEY_OU=MyVPN
...
Enter the following to generate the master Certificate Authority (CA) certificate and key:
$ cd /etc/openvpn/easy-rsa/
$ cp openssl-1.0.0.cnf openssl.cnf
$ source vars
$ ./clean-all
Run the following command to generate CA certificate and CA key:
$ ./build-ca
Example output:
$ ./build-ca
Generating a 1024 bit RSA private key
...............++++++
...++++++
writing new private key to 'ca.key'
-----
You are about to be asked to enter information that will be incorporated
into your certificate request.
What you are about to enter is what is called a Distinguished Name or a DN.
There are quite a few fields but you can leave some blank
For some fields there will be a default value,
If you enter '.', the field will be left blank.
-----
Country Name (2 letter code) [BA]:----> Press Enter
State or Province Name (full name) [RS]:----> Press Enter
Locality Name (eg, city) [Banjaluka]:----> Press Enter
Organization Name (eg, company) [Lint Tut]:----> Press Enter
Organizational Unit Name (eg, section) [MyVPN]:----> Press Enter
Common Name (eg, your name or your server's hostname) [MyVPN]:----> Press Enter
Name [MyVPN]:----> Press Enter
Email Address [info@lintut.com]:----> Press Enter
Server Certificates
Next, we will generate a certificate and private key for the server:
$ ./build-key-server server
Example output:
./build-key-server server
Generating a 1024 bit RSA private key
................++++++
..........++++++
writing new private key to 'server.key'
-----
You are about to be asked to enter information that will be incorporated
into your certificate request.
What you are about to enter is what is called a Distinguished Name or a DN.
There are quite a few fields but you can leave some blank
For some fields there will be a default value,
If you enter '.', the field will be left blank.
-----
Country Name (2 letter code) [BA]:----> Press Enter
State or Province Name (full name) [RS]:----> Press Enter
Locality Name (eg, city) [Banjaluka]:----> Press Enter
Organization Name (eg, company) [Lint Tut]:----> Press Enter
Organizational Unit Name (eg, section) [MyVPN]:----> Press Enter
Common Name (eg, your name or your server's hostname) [server]:----> Press Enter
Name [MyVPN]:----> Press Enter
Email Address [info@lintut.com]:----> Press Enter
.
Please enter the following 'extra' attributes
to be sent with your certificate request
A challenge password []:----> Press Enter
An optional company name []:----> Press Enter
Using configuration from /etc/openvpn/easy-rsa/openssl-1.0.0.cnf
Check that the request matches the signature
Signature ok
The Subject's Distinguished Name is as follows
countryName :PRINTABLE:'BA'
stateOrProvinceName :PRINTABLE:'RS'
localityName :PRINTABLE:'Banjaluka'
organizationName :PRINTABLE:'Lint Tut'
organizationalUnitName:PRINTABLE:'MyVPN'
commonName :PRINTABLE:'server'
name :PRINTABLE:'MyVPN'
emailAddress :IA5STRING:'info@lintut.com'
Certificate is to be certified until Mar 31 21:56:13 2024 GMT (3650 days)
Sign the certificate? [y/n]:y ----> Type Y and Press Enter
.
1 out of 1 certificate requests certified, commit? [y/n]y ----> Type Y and Press Enter
Write out database with 1 new entries
Data Base Updated
Client Certificates
The VPN client will also need a certificate to authenticate itself to the server. Usually you create a different certificate for each client. To create the certificate, enter the following in a terminal while being user root:
$ ./build-key client
Generate Diffie Hellman Parameter
Enter the following command to generate DH parameter.
$ ./build-dh
Go to the directory /etc/openvpn/easy-rsa/keys/ and enter the following command to transfer the above files to /etc/openvpn/ directory.
$ cd /etc/openvpn/easy-rsa/keys/
$ cp dh1024.pem ca.crt server.crt server.key /etc/openvpn/
And then, you must copy all client certificates and keys to the remote VPN clients in order to authenticate to the VPN server. In our case, we have generated certificates and keys to only one client, so we have to copy the following files to the VPN client.
- ca.crt
- client.crt
- client.key
You have to copy the above files to your VPN clients securely. Copy the keys with caution. If anyone have chances to get the keys, they can easily intrude and get full access to your virtual private network.
Configuring VPN Server
Copy the file server.conf.gz file to /etc/openvpn/ directory.
$ cp /usr/share/doc/openvpn/examples/sample-config-files/server.conf.gz /etc/openvpn/
Extract the file using the following command:
$ gzip -d /etc/openvpn/server.conf.gz
Edit file server.conf,
$ vi /etc/openvpn/server.conf
Find and uncomment the following lines to route client systems traffic through OpenVPN server.
[...]

push "redirect-gateway def1 bypass-dhcp"

[...]
Also, Uncomment and change the DNS servers to reflect your own DNS values. Here I am using Google public DNS servers.
[...]

push "dhcp-option DNS 208.67.222.222"
push "dhcp-option DNS 208.67.220.220"

[...]
Uncomment the following lines:
[...]

user nobody
group nogroup

[...]
Save and close the file.
Then we need to copy and edit the client.conf file. We need this file to be transferred to the VPN clients. First copy the file to any location (ex. /home directory).
$ cp /usr/share/doc/openvpn/examples/sample-config-files/client.conf /home/
Edit file client.conf,
$ vi /home/client.conf
Set the VPN server host name/IP address:
# The hostname/IP and port of the server.
# You can have multiple remote entries
# to load balance between the servers.
remote 192.168.1.5 1194 # Enter IP on your OpenVPN server
IP forwarding and routing Configuration
Edit sysctl.conf file,
$ vi /etc/sysctl.conf
Find the following line and set value “1” to enable IP forwarding.
# Controls IP packet forwarding
net.ipv4.ip_forward = 1
Run the following command to apply the sysctl changes.
$ sysctl -p
Enter the following command to enable IP forwarding:
$ echo 1 > /proc/sys/net/ipv4/ip_forward
Adjust iptables to forward traffic through VPN properly.
Enter the following commands one by one to forward traffic through OpenVPN:
$ iptables -A FORWARD -m state --state RELATED,ESTABLISHED -j ACCEPT
$ iptables -A FORWARD -s 10.8.0.0/24 -j ACCEPT
$ iptables -A FORWARD -j REJECT
$ iptables -t nat -A POSTROUTING -s 10.8.0.0/24 -o eth0 -j MASQUERADE
Install iptables-persistent and save the iptables rules:
$ apt-get install iptables-persistent
Accept the defaults and save the iptables rules.
If you use UFW, you should run the following commands to allow openvpn port 1194:
$ ufw allow 1194/udp
$ ufw allow 1194/tcp
Finally, start openvpn service and make it to start automatically on every reboot using the following commands:
$ service openvpn start
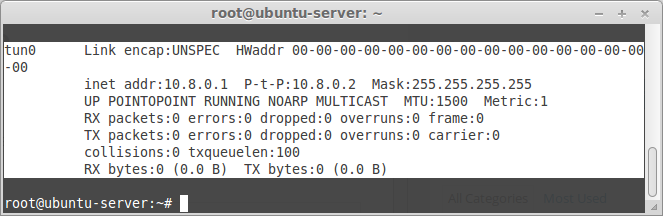
Verify if VPN interface(tun0) is created using ifconfig command:
$ ifconfig
Sample output:
Configuring OpenVPN Client
Finally lets create a server.ovpn config file. To make it easy, you can simply create it on your local computer using Notepad (or any other simple text editor tool). Enter following in that file:
client
dev tun
proto udp
remote 192.168.1.5 1194 # - Your server IP and OpenVPN Port
resolv-retry infinite
nobind
tun-mtu 1500
tun-mtu-extra 32
mssfix 1450
persist-key
persist-tun
ca ca.crt
auth-user-pass
comp-lzo
reneg-sec 0
verb 3
Then save it with .ovpn extension. Save that file in the config directory of where you installed OpenVPN client in your computer.

Thank you for writing this awesome article.
I’m a long time reader but I’ve never been compelled to leave
a comment. I subscribed to your blog and shared this on my Twitter.
Thanks again for a great article!