Squid is a full-featured Linux-based proxy application mostly used for filtering traffic, security, and DNS lookups. It is also used to improve the web server performance by caching resources. In simple terms, a Squid server is a computer that acts as an intermediary between a desktop computer and the internet that redirects inbound client requests to a server where data is stored for easier retrieval. It supports several protocols including, HTTP, FTP, TLS, SSL, Internet Gopher and HTTPS.
This guides explains how to install and configure Squid proxy on Ubuntu 20.04.
[box type=”info” align=”” class=”” width=””]See also: How to Install and Configure Squid Proxy on CentOS 7[/box]
Squid Proxy Server on Ubuntu 20.04 Server
Before starting, you will need to update your system packages to the latest version. You can update them with the following command:
[box type=”note” align=”” class=”” width=””]Note that for all the commands, I will be running them as root user! [/box]
[ads1]
$ sudo apt-get update
$ sudo apt-get upgrade
Once all the packages are updated, restart your system to apply the changes.
To install Squid proxy, run the below commands. Also enable to start on system boot then check status:
$ sudo apt-get install -y squid
$ sudo systemctl start squid
$ sudo systemctl enable squid
$ sudo systemctl status squid
If squid is properly installed and running, you should an output as shown:
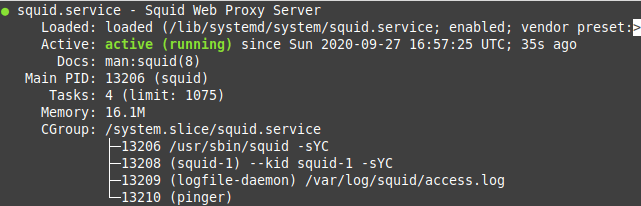

Configure Squid proxy server on Ubuntu 20.04
The squid configuration file is located at /etc/squid/squid.conf and /etc/squid/conf.d/ directory. Let us edit the /etc/squid/squid.conf using a text editor. Make a backup of the original file so that we can go back if something goes wrong using the cp command:
$ sudo cp -v /etc/squid/squid.conf{,.bkp}
Now, do your custom settings in /etc/squid/squid.conf. Open the file with your preferred file editor:
$ sudo nano /etc/squid/squid.conf
Change squid default port
The default Squid tcp port is 3128.To alter this, open squid.conf file and look for http_port line. Change to your desired port number and save the file.
#http_port 3128
http_port 8080
Make sure to allow the port though the firewall
$ sudo ufw allow 8080/tcp
$ sudo ufw enable
Set Squid cache memory size
[ads1]
To set your desired cache memory, use the settings below. For my case, I am using 512 MB:
cache_mem 512 MB


Specify DNS name-servers to use
To define your own DNS servers, use the command as shown
dns_nameservers 8.8.8.8 8.8.4.4
Define ACLs for Squid proxy server
ACLs (Access control lists) are statements that define what is allowed to pass through the proxy server and what is denied. Every statement must begin with acl followed by the name of the rule. After the name is the acltype and finally the argument or file. Where files are used, each line in the file must contain only one item.
acl aclname acltype argument..
acl aclname acltpe “file”…
Example:
Allow LAN network through Squid proxy server
Create the acl rule
acl my_lan src 192.168.100.0/24
Now either allow or deny based on the defined rule, with the use of http_access directive. In our case, we need to allow
http_access allow my_lan
[box type=”note” align=”” class=”” width=””]Note that the last rule every time you create ACL access rules should be the deny all. This should be done when you have allowed all the required sites otherwise you might block yourselves from accessing some needed sites.[/box]
How to block access to specific websites in Squid proxy server
Let us block twitter.com and facebook.com:
acl deniedsites dstdomain facebook.com twitter.com
http_access deny deniedsites
Note that everytime you make changes, you must restart squid server
$ systemctl restart squid
Block URLs using keywords
Say if any url contains keyword such as “foo” or “browse.php?u=” block it using the url_regex acl:
acl urlkeywordsblocks url_regex -i "/etc/squid/blocked-urls-keyword.conf"
http_access deny urlkeywordsblocks
Create a file named /etc/squid/blockd-urls-keyword.conf as follows:
sudo nano /etc/squid/blocked-urls-keyword.conf
Append the urls/keywords:
foo
browse.php?u=
Set Up IP Based Authentication
There are several ways you can restrict the client to access the internet. In this section, we will set up Squid to authenticate based on Client’s IP address.
You can do it by editing Squid default configuration file:
$ nano /etc/squid/squid.conf
Add the following line at the beginning of the file:
acl client1 src 192.168.100.8
acl client2 src 192.168.100.17
http_access allow client1 client2
Save and close the file when you are finished. Then restart the Squid service to apply the changes:
$ systemctl restart squid
- client1 and client2 is the name that identified the client computers.
- 192.168.100.8 and 192.168.100.17 is the IP address of the client computer.
Now, only computers that are configured with IP 192.168.100.8 and 192.168.100.17 can access the internet.
Set Up User Based Authentication
You can also set up Squid to authenticate based on user and password. To do so, you will need to install Apache utils package in your system.
Run the following command to install the Apache utils package:
$ sudo apt install apache2-utils -y
Once installed, create a first user with the following command:
htpasswd /etc/squid/passwd client1
You will be asked to set a password as shown below:
New password:
Re-type new password:
Adding password for user client1
Next, create a second user with the following command:
$ htpasswd /etc/squid/passwd client2
Set your password as shown below:
New password:
Re-type new password:
Adding password for user client2
Next, open the Squid default configuration file:
$ nano /etc/squid/squid.conf
Remove the first three lines which you have added in previous section and add the following lines at the beginning of the file:
auth_param basic program /usr/lib/squid3/basic_ncsa_auth /etc/squid/passwd
acl ncsa_users proxy_auth REQUIRED
http_access allow ncsa_users
[ads1]
Save and close the file. Then, restart the Squid proxy service to apply the changes:
$ sudo systemctl restart squid
Now, you will need to provide username and password in order to access the internet.
Verify Squid Proxy
Next, you will need to define your Proxy server in your Mozilla web browser.
Go to the client system, open the Mozilla web browser, and click on the Edit => Preferences as shown below:

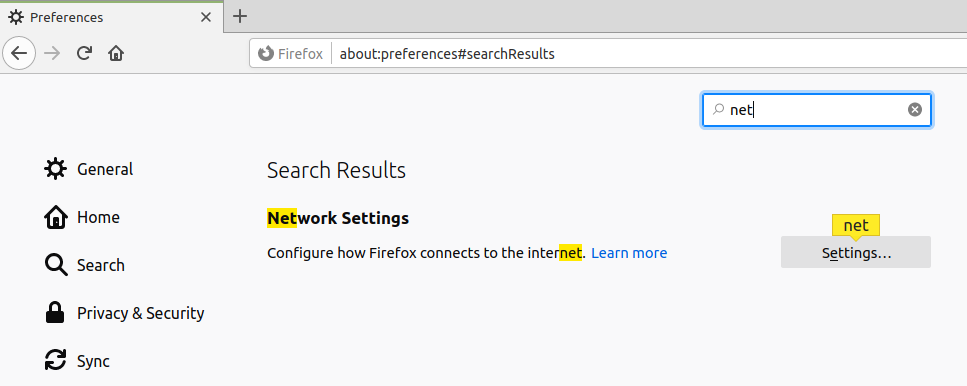
Click on the Network Settings section and click on the Settings. You should see the following page:

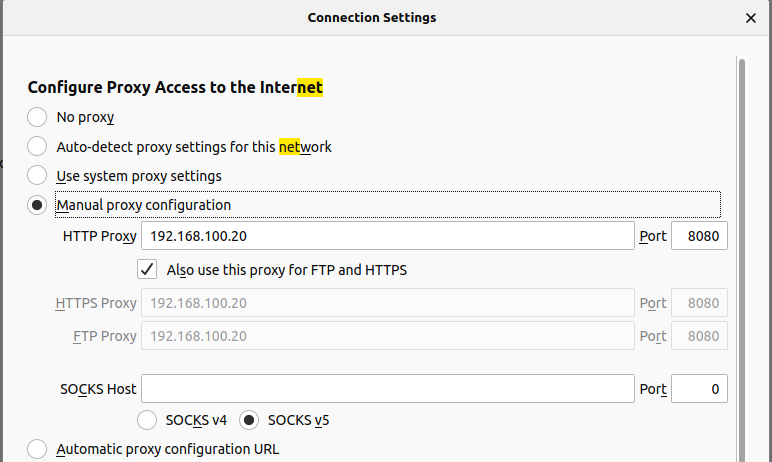
Select the Manual proxy configuration radio button, enter your Squid server IP address in the HTTP Host field and 8080 in the Port field and select the Use this proxy server for all protocols check box and click on the OK button to save the settings.
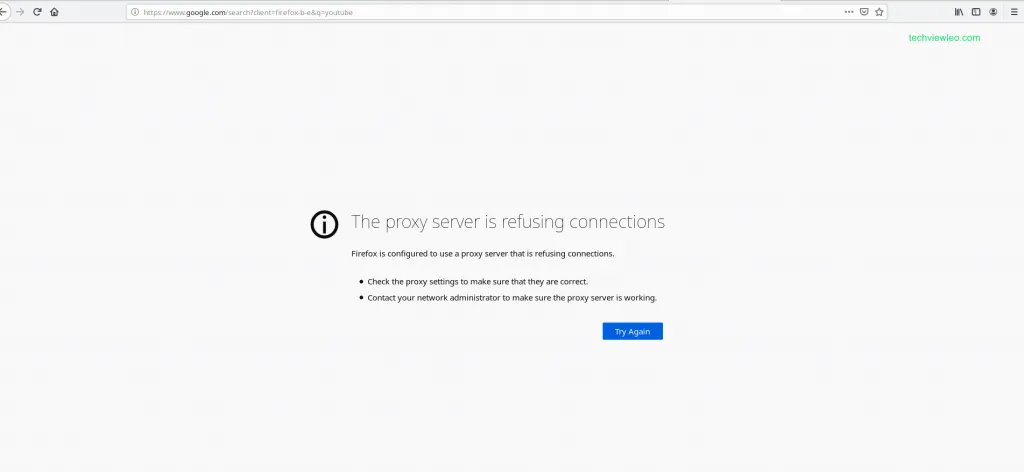
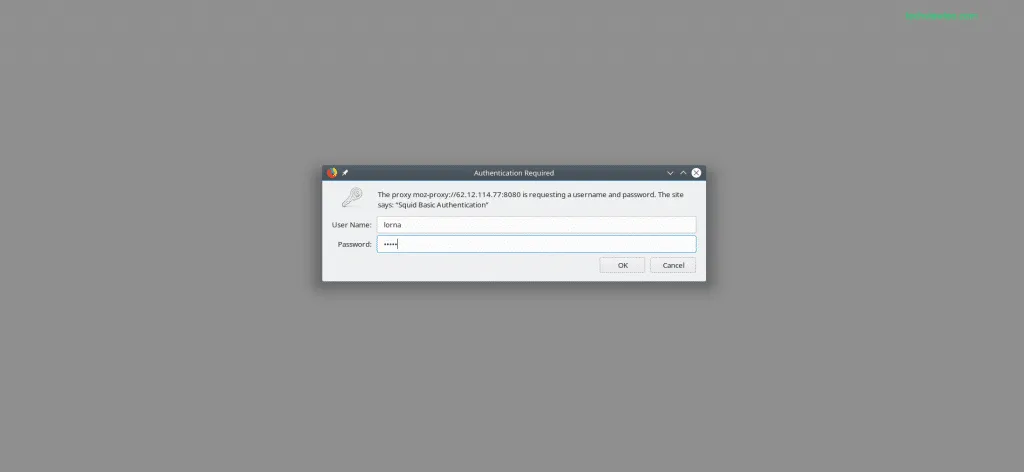
Now confirm your Squid proxy set up is working. Open the Firefox browser and try to search a restricted site such as youtube.com for my case. You should see a page saying ‘proxy server refuse connections’
Now open another site that is not restricted. You should be prompted for authentication which after entering your username and password, you should be able to access the site.

Conclusion
This has been a step-by-step guide on how to install and configure Squid proxy server in Ubuntu 20.04. I hope you have enjoyed. Please share your feedback in the comments section.